Como Crear una API REST con Django 3.1.1 + Consumir Datos en una Aplicación Android – Parte 7 (Final)
Demo Github
En la parte anterior de este tutorial llamada Como Crear una API REST con Django 3.1.1 + Consumir Datos en una Aplicación Android – Parte 6, iniciamos el proceso de creación de la aplicación Android, usamos el lenguaje de programación Kotlin y logramos obtener los datos desde la API REST, enviando previamente un token de seguridad. Pero los datos solo los recibiamos en la pestaña Run de Android Studio y necesitamos agregar cierta funcionalidad a la aplicación, para que muestre los datos de manera amigable para el usuario. En esta parte 7 continuaremos con la creación del tutorial Como Crear una API REST con Django 3.1.1 + Consumir Datos en una Aplicación Android, vamos con ello.
Partes
Antes de continuar te invito a escuchar el Podcast: “Las Buenas Prácticas Un Hábito Importante en la Programación” y “ChatGPT ¿ Dejará sin empleo a los Desarrolladores ? (Anchor Podcast)”:
| Spotify: | Sound Cloud: | Apple Podcasts | Anchor Podcasts |
 |
 |
 |
 |
Bien ahora continuemos con el Post: Como Crear una API REST con Django 3.1.1 + Consumir Datos en una Aplicación Android – Parte 7 (Final).
Adapter (Contenedor de Datos)
Para que los datos se muestren de manera amigable vamos a utiliar un adapter. Creo un archivo con el nombre datosAdapter.kt y agrego lo siguiente:
package com.example.myapplication

import android.view.LayoutInflater
import android.view.View
import android.view.ViewGroup
import android.widget.ImageView
import android.widget.TextView
import androidx.recyclerview.widget.RecyclerView
import com.bumptech.glide.Glide


class datosAdapter(private var mLista: List<Datos>) : RecyclerView.Adapter<datosAdapter.DatosViewHolder>() {

    class DatosViewHolder(itemView: View) : RecyclerView.ViewHolder(itemView) {

        fun bind(property: Datos) {

            val nombre = itemView.findViewById<TextView>(R.id.nombre)
            val precio = itemView.findViewById<TextView>(R.id.precio)
            val stock = itemView.findViewById<TextView>(R.id.stock)
            val img = itemView.findViewById<ImageView>(R.id.img)

            nombre.text = property.nombre
            precio.text = property.precio
            stock.text = property.stock
            Glide.with(itemView.context).load(property.img).centerCrop().into(img)

        }

    }

    override fun onCreateViewHolder(parent: ViewGroup, viewType: Int): DatosViewHolder {

        val v = LayoutInflater.from(parent.context).inflate(R.layout.card, parent, false)
        return DatosViewHolder(v)

    }

    override fun getItemCount(): Int {

        return mLista.size

    }

    override fun onBindViewHolder(holder: DatosViewHolder, position: Int) {

        holder.bind(mLista[position])

    }


}
Dentro del layout de mi actividad principal, es decir el archivo activity_main.xml agrego un RecyclerView que servirá de contenedor para los registros que enviamos desde el Adapter. Agrego lo siguiente:
<?xml version="1.0" encoding="utf-8"?>
<androidx.drawerlayout.widget.DrawerLayout
    xmlns:android="http://schemas.android.com/apk/res/android"
    xmlns:app="http://schemas.android.com/apk/res-auto"
    xmlns:tools="http://schemas.android.com/tools"
    android:id="@+id/drawer"
    android:layout_width="match_parent"
    android:layout_height="match_parent"
    android:background="@color/white"
    tools:context=".MainActivity">

    <LinearLayout
        android:layout_width="match_parent"
        android:layout_height="wrap_content"
        android:paddingTop="55dp"
        android:orientation="vertical" >

        <androidx.recyclerview.widget.RecyclerView
            android:id="@+id/recyclerview"
            android:layout_width="match_parent"
            android:layout_height="match_parent"
            tools:itemCount="5"
            android:paddingTop="35dp"
            tools:listitem="@layout/card" />

    </LinearLayout>

</androidx.drawerlayout.widget.DrawerLayout>
También creo un layot con el nombre card.xml en donde colocaré un CardView que servirá para cada elemento o registro independientemente en el RecyclerView, agrego lo siguiente:
<?xml version="1.0" encoding="utf-8"?>
<androidx.cardview.widget.CardView
    xmlns:android="http://schemas.android.com/apk/res/android"
    xmlns:app="http://schemas.android.com/apk/res-auto"
    android:layout_width="match_parent"
    android:layout_height="wrap_content"
    android:layout_margin="10dp"
    app:cardElevation="6dp">

    <LinearLayout
        android:layout_width="match_parent"
        android:layout_height="wrap_content"
        android:orientation="vertical"
        android:padding="5dp">

        <ImageView
            android:id="@+id/img"
            android:layout_width="match_parent"
            android:layout_height="200dp" />

        <TextView
            android:id="@+id/nombre"
            android:layout_width="wrap_content"
            android:layout_height="wrap_content"
            android:layout_marginStart="10dp"
            android:text="Nombre"
            android:textSize="17sp" />

        <TextView
            android:id="@+id/precio"
            android:layout_width="wrap_content"
            android:layout_height="wrap_content"
            android:layout_marginStart="10dp"
            android:text="Precio"
            android:textSize="17sp" />

        <TextView
            android:id="@+id/stock"
            android:layout_width="wrap_content"
            android:layout_height="wrap_content"
            android:layout_marginStart="10dp"
            android:text="Stock"
            android:textSize="17sp" />


    </LinearLayout>

</androidx.cardview.widget.CardView>
He realizado unos cambios en el archivo de la actividad principal, es decir en MainActivity.kt, estos cambios son para cargar el Adapter y el RecyclerView en la aplicación:
package com.example.myapplication

import android.content.Context
import androidx.appcompat.app.AppCompatActivity
import android.os.Bundle
import android.util.Log
import androidx.recyclerview.widget.GridLayoutManager
import androidx.recyclerview.widget.LinearLayoutManager
import androidx.recyclerview.widget.RecyclerView
import retrofit2.Call
import retrofit2.Callback
import retrofit2.Response

class MainActivity : AppCompatActivity() {

    // Variables para cargar el Adapter y RecyclerView
    private lateinit var recyclerView: RecyclerView
    private lateinit var manager: RecyclerView.LayoutManager
    private lateinit var myAdapter: RecyclerView.Adapter<*>

    override fun onCreate(savedInstanceState: Bundle?) {
        super.onCreate(savedInstanceState)
        setContentView(R.layout.activity_main)

        obtenerToken()

        // Mostramos los datos en el RecyclerView
        manager = LinearLayoutManager(this)
        recyclerView = findViewById(R.id.recyclerview)

    }

    fun obtenerToken() {

        val token = "eyJhbGciOiJIUzI1NiIsInR5cCI6IkpXVCJ9.eyJ0b2tlbl90eXBlIjoicmVmcmVzaCIsImV4cCI6MTY3NjgwOTYwMSwiaWF0IjoxNjc2NzIzMjAxLCJqdGkiOiI5OWZjZGJmNjhmNzk0ODAwYTU5NWJkYjIzMjUzOWYyZiIsInVzZXJfaWQiOjF9.nGw0CHVI0BgqZu9mFkfxd7rCCdU_pdE-VAqHa59hjvI"

        Servicio.instancia.obtToken(token)
            .enqueue(object : Callback<Token> {
                override fun onResponse(call: Call<Token>, response: Response<Token>) {

                    val message = response.body()?.access
                    Log.e("respuesta", message.toString())

                    // Guardamos el token obtenido en Shared Preferences
                    val sp = getSharedPreferences("token", Context.MODE_PRIVATE)
                    val editor = sp.edit()
                    editor.putString("access", message.toString())
                    editor.apply()

                    obtenerDatos()


                }

                // Si hay error al obtener los datos, mostramos un mensaje
                override fun onFailure(call: Call<Token>, t: Throwable) {
                    Log.e("Estado", "Hubo Error al solicitar datos", t)
                }

            })

    }

    private fun obtenerDatos() {

        // Leemos el token almacenado en Shared Preferences
        val sp = getSharedPreferences("token", Context.MODE_PRIVATE)
        val token = sp.getString("access", "")

        val datos = Servicio.instancia.listarDatos("Bearer $token", q = "all", nombre = String())
        datos.enqueue(object : Callback<List<Datos>?> {

            override fun onResponse(call : Call<List<Datos>?>, response: Response<List<Datos>?>) {
                //val data = response.body()?.get(0)?.nombre
                val data = response.body()
                Log.e("fresa1", data.toString())

                recyclerView = findViewById<RecyclerView>(R.id.recyclerview).apply{
                    myAdapter = datosAdapter(response.body()!!)
                    layoutManager = manager
                    recyclerView.layoutManager = GridLayoutManager(applicationContext, 2)
                    adapter = myAdapter

                }

            }

            // Si hay error al obtener los datos, mostramos un mensaje
            override fun onFailure(call: Call<List<Datos>?>, t: Throwable) {
                Log.e("fresa2", "Hubo Error al solicitar datos", t)
            }

        })

    }


}
Entonce si ejecuto la aplicación, obtengo los datos de la API REST en una interface más amigable para los usuarios:

Ahora veamos algunas últimas configuraciones en Django Framework.
Configuraciones Adicionales en Django
Para que las imágenes de la API REST carguen correctamente, voy hacer alguns configuraciones. Primer abro el archivo settings.py y agrego lo siguiente:
# Las rutas para las imágenes de cada registro o jugo (puedes hacer lo mismo para los postres)
MEDIA_URL = '/jugos/img/'
MEDIA_ROOT = os.path.join(BASE_DIR, 'jugos/static')
Ahora voy al archivo urls.py y creo la ruta para cargar las imágenes de la API REST:
"""api_rest_django URL Configuration

The `urlpatterns` list routes URLs to views. For more information please see:
    https://docs.djangoproject.com/en/3.1/topics/http/urls/
Examples:
Function views
    1. Add an import:  from my_app import views
    2. Add a URL to urlpatterns:  path('', views.home, name='home')
Class-based views
    1. Add an import:  from other_app.views import Home
    2. Add a URL to urlpatterns:  path('', Home.as_view(), name='home')
Including another URLconf
    1. Import the include() function: from django.urls import include, path
    2. Add a URL to urlpatterns:  path('blog/', include('blog.urls'))
"""
from django.contrib import admin
from django.urls import include, path

from rest_framework.routers import DefaultRouter

# Importamos Django REST Framework, también la vista 'jugos' y postres
from jugos import views as jugos_views
from postres import views as postres_views

# Simple JWT
from rest_framework_simplejwt import views as jwt_views

# Configuración para cargar las imágenes de la API REST
from django.urls import re_path as url
from django.conf import settings
from django.views.static import serve

router = DefaultRouter()
router.register(r'jugos', jugos_views.JugosViewSet, basename='jugos')
router.register(r'postres', postres_views.PostresViewSet, basename='postres')

urlpatterns = [
    path('admin/', admin.site.urls),
    path('', include(router.urls)),

    # Rutas para generar y refrescar los JWT (JSON Web Tokens)
    path('api/token/', jwt_views.TokenObtainPairView.as_view(), name='token_obtain_pair'),
    path('api/token/refresh/', jwt_views.TokenRefreshView.as_view(), name='token_refresh'),

    # Ruta para cargar las imágenes de la API REST
    url(r'^jugos/(?P<path>.*)$', serve, {'document_root': settings.MEDIA_ROOT, })
]
Nota: Recuerda que he colocado un enlace a un repositorio de GitHub en esta última parte del tutorial, en el encontrarás el código de la API REST con Django y el código de la aplicación Android. Asimismo en cada parte del tutorial, he colocado una Demo, para que veas el proyecto en acción.
Bien, eso es todo, hemos creado un sistema de API REST con una aplicación que lee los datos.
Conclusión
Las API REST son muy importantes en la actualidad, ya que la mayoría de aplicaciones tanto móviles como desktop, suelen usarlas para transmitir datos. Saber crear esta API REST te ayudará a crear tus propioas API REST y agregarles funcionalidades más avanzadas o complejas.
Nota (s)
- No olvides que debemos usar la Tecnología para hacer cosas Buenas por el Mundo.
Síguenos en nuestras Redes Sociales para que no te pierdas nuestros próximos contenidos.


 Seguimos trabajando las 24 horas del día para brindarte la mejor experiencia en la comunidad.
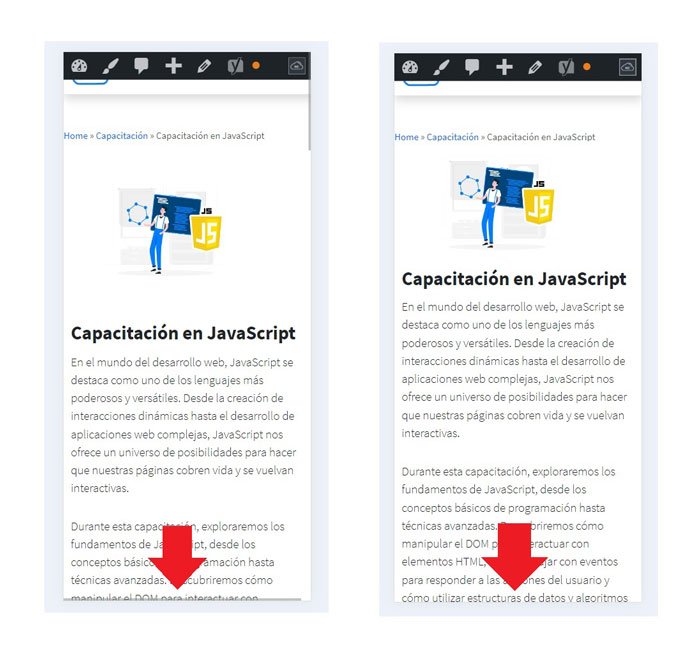 Hemos corregido el problema y ahora la web no muestra esa barra horizontal y se ve en su tamaño natural.
Seguimos trabajando las 24 horas del día, para mejorar la comunidad.
Hemos corregido el problema y ahora la web no muestra esa barra horizontal y se ve en su tamaño natural.
Seguimos trabajando las 24 horas del día, para mejorar la comunidad. Seguimos trabajando las 24 horas y 365 días del año para mejorar tu experiencia en la comunidad.
 Seguimos trabajando para brindarte le mejor experiencia en Nube Colectiva.

Social
Redes Sociales (Developers)
Redes Sociales (Digital)